CS 444 Artificial Intelligence
Spring 2021
- Mac/OS
- Ubuntu/Mint 20
- Virtual Box running Ubuntu/Mint 20. (see instructions for install a VM with Ubuntu/Mint 20)
Limited MS Windows Support
In theory, Python and the required packages should run in a Windows environment, however, limited assistance will be available for Windows installations.Configuring a Development Environment
This document contains the procedure for building a programming/development
environment for this AI class.
Install Python
Install Python on a MAC
Just visit python.org and download the latest version that
is above 3.7. Run the .pkg file that you download and Python should be installed. To run
this version of Python from the command line, simply type in the python followed by the
version number, for example:
This class will utilize Python 3 and recommends at least Python 3.7 (or higher).
python3.7Virtual Environment (venv) on Ubuntu/Mint
Simply use apt-get if you running Ubuntu/Mint 20.
                    sudo apt-get update
                    sudo apt-get install python3-distutils python3-pip python3-dev python3-venv
Install on Windows
Just visit python.org and download the latest version that
is above 3.7. I downloaded the Windows embeddable package (64-bit), unzipped the
file, and then I could run the python.exe located in that directory.
Setup up a Virtual Python Environment (venv)
A virutal python environment allows the installation of packages and
tools that are only visable in that environment. It avoids conflicts
between packages.
To create a virtual environment, follow these steps:
 You will probably want this environment setup each time use start
the shell, which can be accomplished by adding this to your .bashrc file for Ubuntu/Mint
or your .bash_profile file on Mac.
You will probably want this environment setup each time use start
the shell, which can be accomplished by adding this to your .bashrc file for Ubuntu/Mint
or your .bash_profile file on Mac.
cd # places you in your home directory
                python3.7 -m venv cs444_venv
source $HOME/cs444_venv/bin/activate
Install Python ToolSets
The remaining steps install Python software packages utilizing
pip (a package manager for Python). For this class, I highly
recommend creating a virtual python environment (as detailed
in the prior step).
The following procedure will work on Mac or Ubuntu and should work on
Windows from a shell configured to access the correct version of
Python (running activiate as described above). You can also install
these packages using PyCharm (the next section details how to install
PyCharm).
First, start a terminal window by click on the black screen icon, located
in the bottom left corner (for me, it is the 4th small icon from the left).
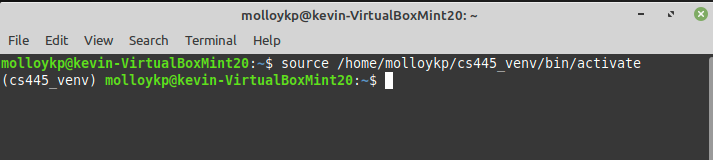
Next, make sure you venv environment is active by doing one of the
following commands (Ubuntu/Mac only):
- which python command (make sure that path is to the python link in your venv)
- Notice that your shell prompt has the venv environment name prefixd in the front (as shown in the image of the terminal window from the prior section)
                pip install --upgrade pip
                pip install wheel
                pip install setuptools
                pip install numpy
                pip install matplotlib
                pip install notebook
                pip install pandas
                pip install PyQt5
                pip install seaborn
                pip install sklearn
                pip install nbgrader
                jupyter nbextension install --sys-prefix --py nbgrader
                jupyter nbextension enable --user validate_assignment/main --section=notebook
                jupyter serverextension enable --user nbgrader.server_extensions.validate_assignment
Install the PyCharm IDE
PyCharm provides a nice language aware editor, a
linter (something that checks
your syntax as you type), and a nice debugger. Other IDE's
that are popular are Spyder (especially
popular with computational biologists), and MS Visual Code.
This procedure focuses on PyCharm. To obtain a copy of PyCharm and install it, follow these steps:
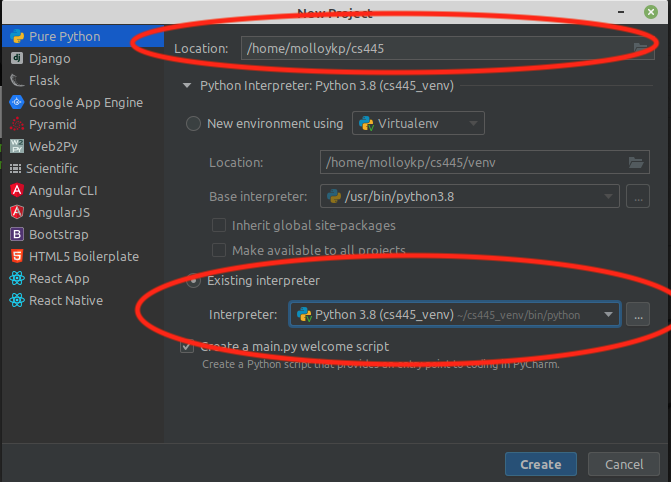 You can also control where you project
files will be kept. I would strongly recommend storing these files where they will
be routinely backed up. When I use a VM, I setup a mount point/directory from
my Mac (which gets backed up). I would also recommend using
GIT (since it will provide another layer of safety and utility).
You can also control where you project
files will be kept. I would strongly recommend storing these files where they will
be routinely backed up. When I use a VM, I setup a mount point/directory from
my Mac (which gets backed up). I would also recommend using
GIT (since it will provide another layer of safety and utility).
- Register for a free version of PyCharm professional. Visit https://www.jetbrains.com/student/. Typically it takes less than 5 minutes for a license to get approved.
- After being approved, create your JetBrains account. You will need this to register your copy of PyCharm.
- Download the PROFESSIONAL version of pycharm from https://www.jetbrains.com/pycharm/download. At the welcome screen, select activate new license with: JetBrains account
You can also control where you project
files will be kept. I would strongly recommend storing these files where they will
be routinely backed up. When I use a VM, I setup a mount point/directory from
my Mac (which gets backed up). I would also recommend using
GIT (since it will provide another layer of safety and utility).